Artificial Intelligence (AI) is no longer limited to tech giants or data scientists. Thanks to OpenAI Agent Builder, anyone can now create custom AI agents tailored to specific tasks — no advanced coding skills required. Whether you want to automate business workflows, build a smart assistant, or create a personalized chatbot, the OpenAI Agent Builder provides the tools to make it happen easily and efficiently.
In this blog, we’ll explain what OpenAI Agent Builder is, how you can start using it, the steps to build your first agent, and the key benefits — along with a quick look at its pros and cons.
What Is OpenAI Agent Builder?
The OpenAI Agent Builder is a powerful platform that allows users to design, train, and deploy custom AI agents within the OpenAI ecosystem. These agents can perform various tasks such as answering customer questions, automating workflows, or integrating with APIs to fetch real-time information.
It’s built on the same advanced technology that powers ChatGPT but gives users more control, customization, and flexibility to shape the AI’s behavior and knowledge base.
With Agent Builder, you can:
-
Create specialized AI agents for specific industries or business needs.
-
Customize how the AI responds and interacts.
-
Integrate external tools and data sources.
-
Deploy your agent across web apps or internal systems.
How to Start with OpenAI Agent Builder
Getting started with the OpenAI Agent Builder is straightforward, even for beginners. Here’s what you need to do:
-
Sign in to your OpenAI Account
Visit OpenAI.com and log in to your account. You’ll need an active OpenAI account to access the Agent Builder feature. -
Access the Agent Builder Dashboard
Once logged in, navigate to the Agent Builder section. Here you can explore existing templates or start building a new agent from scratch. -
Understand Your Goal
Before building, decide what you want your agent to do — for example, customer support, lead generation, content creation, or data automation. -
Prepare Basic Knowledge and Data
Gather the key data, documents, or examples that your AI agent will rely on to respond accurately.
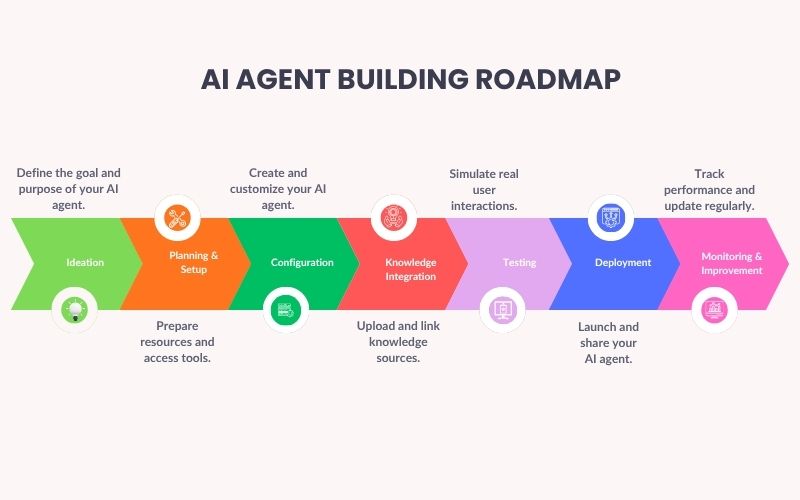
How to Build Your First AI Agent (Detailed Step-by-Step Guide)
Creating your first AI agent with OpenAI Agent Builder is a straightforward but powerful process. The platform is designed to guide you through every stage — from defining your agent’s purpose to deploying it for public or private use. Here’s a detailed breakdown:
Step 1: Create a New Agent
Once you log in to your OpenAI account and access the Agent Builder Dashboard, click on “Create a new agent.”
You’ll need to:
-
Name your agent: Choose a name that reflects its role (e.g., “Travel Assistant” or “SupportBot”).
-
Add a description: Briefly describe what your agent does — for example, “Helps users book flights and hotels.”
This step sets the foundation for how your agent will be identified within your workspace.
Step 2: Define the Agent’s Purpose and Role
Before your agent can think and respond intelligently, it needs clear instructions.
In the “Instructions” or “System Message” section, describe your agent’s goals, tone, and limits.
For example:
“You are a friendly customer support assistant who helps users troubleshoot product issues. Always stay polite, provide step-by-step help, and avoid giving unrelated answers.”
This helps shape your agent’s personality and response style, ensuring consistent, high-quality interactions.
Step 3: Add Knowledge Sources
Your agent needs information to perform well. OpenAI Agent Builder allows you to upload documents or link external content that the agent can refer to when answering questions.
You can add:
-
Text files, PDFs, or FAQs
-
Product manuals or training guides
-
Knowledge base URLs
Each file expands your agent’s knowledge base, making it smarter and more reliable when handling user queries.
Step 4: Customize Behavior and Personality
Now it’s time to make your agent sound and act the way you want. You can adjust:
-
Tone of voice (friendly, professional, technical, or playful)
-
Response length and detail level
-
Preferred language or phrasing style
Example:
If your agent is meant for HR support, you might want a calm, empathetic tone.
If it’s a tech assistant, go for concise, confident answers.
This customization ensures your agent aligns with your brand’s personality and communication goals.
Step 5: Integrate Tools or APIs (Optional but Powerful)
If you want your AI agent to do more than chat, OpenAI Agent Builder allows tool integrations.
This means your agent can perform real tasks, such as:
-
Fetching live data from APIs (e.g., weather, stock updates)
-
Sending emails or Slack messages
-
Booking appointments or tickets
-
Connecting with business tools like CRMs or analytics systems
You can connect APIs through the Tools or Integrations section, giving your agent real-time capabilities beyond text responses.
Step 6: Test Your Agent
Testing is one of the most important steps.
OpenAI provides a built-in chat interface where you can:
-
Interact with your agent in real time
-
Test how it handles different types of queries
-
Identify gaps or incorrect responses
Use this stage to refine:
-
Instructions (add or remove clarity)
-
Data sources (upload more relevant info)
-
Personality settings (adjust tone if needed)
Testing helps ensure your agent performs as expected before going live.
Step 7: Refine and Train
Once testing reveals improvement areas, fine-tune your agent.
You can:
-
Add more specific examples of questions and answers.
-
Improve response quality by refining its “prompt” or instructions.
-
Reorder or rewrite uploaded content for clarity.
This “training” process doesn’t require traditional machine learning — it’s all about refining instructions and knowledge inputs so the agent delivers consistent, accurate results.
Step 8: Deploy and Share
After your agent is fully tested and optimized, you can deploy it.
OpenAI Agent Builder gives several options:
-
Public Sharing: Let anyone interact with your agent via a link.
-
Private Use: Keep it internal for your team or business.
-
Embed on Your Website: Generate a widget or integration code to place your agent directly on a webpage.
Once deployed, your AI agent is live and ready to assist users, handle inquiries, or automate daily tasks!
Step 9: Monitor and Improve
After launch, monitor how users interact with your agent. OpenAI provides usage analytics that help track:
-
Common questions users ask
-
How well the agent responds
-
Areas for improvement
Regularly updating your data, instructions, and integrations ensures your agent stays accurate and relevant over time.
Benefits of Using OpenAI Agent Builder
Building an AI agent through OpenAI offers several advantages:
-
No-Code Solution: You can create AI agents without programming knowledge.
-
Customization: Personalize your agent’s responses, style, and purpose.
-
Efficiency: Automate repetitive tasks and save time.
-
Integration Ready: Connect to apps, APIs, and data sources.
-
Scalable: Create multiple agents for different tasks or departments.
-
Data Privacy: Manage what your agent knows and how it interacts.
Pros and Cons of OpenAI Agent Builder
| Pros | Cons |
|---|---|
| Easy to use, even for non-coders | Limited customization in early stages |
| Integrates with APIs and tools | May require paid OpenAI plan for full features |
| Secure and reliable | Performance depends on data quality |
| Helps automate repetitive workflows | Requires testing for complex scenarios |
| Constantly updated by OpenAI | Some integrations may need technical setup |
Conclusion
The OpenAI Agent Builder marks a new era in AI accessibility. It empowers anyone — from business owners to developers — to build and deploy custom AI agents that can perform real, valuable work. With its user-friendly interface, scalability, and flexibility, OpenAI has made intelligent automation simpler than ever.
If you’re ready to explore the power of AI, start building your first agent today. The future of automation and smart assistance is now at your fingertips!